Whether it's a grow kit or DIY setup, read on to learn how to get started growing your own delicious and nutritious mushrooms.

Growing your own mushrooms is an unforgettable experience. It’s unlike having a garden, fermenting food, or cultivating any other life form. It reveals a cryptic process that is seldom observed so intimately in nature.
When growing mushrooms for the first time, fascination colonizes your mind as you watch the cobweb mycelium grow into its substrate. From the fuzzy burst of fungal cotton you see days after inoculation, to the final harvest of the majestic fruiting bodies that almost appear too picturesque to believe. And it’s not only the cultivator that becomes fascinated.
Friends, family, neighbors, and all those seeing mushroom cultivation for the first time become bewildered. “How did you tame this strange filamentous creature?” they’ll ask. Even after years of experience, I am always surprised by the way fungal mycelium behaves. It often grows in unexpected ways that always leave me with more questions.
While growing mushrooms seems like a foreign and possibly complicated process, it can actually be simple, fun, and easy. There are many ways to do it that are suitable for all ages and levels of experience.
The Easiest Way To Grow Mushrooms
The easiest way to cultivate mushrooms for the first time is to buy a mushroom grow kit. These pre-inoculated grow kits come ready to go and require almost no technical experience. The only work involved is placing it in the proper growing environment and giving it regular spritzes of water. In most cases, this is all it takes for you to produce the prized mushroom fruiting bodies!
Grow Kits are composed of 3 main components:
1. Substrate: This is an organic material that serves as suitable food and habitat for the fungal mycelium. This substrate undergoes a pasteurization or sterilization process that “cooks” it clean of unwanted microorganisms.
2. Mycelium: This is the equivalent of a root network for mushrooms (although it's very different from plant roots). It is a cottony spiderweb-like growth that you’ve probably seen under an old wooden board or in the leaf litter of the forest. The fungal culture is most often introduced into grow kits via “Grain Spawn” or the equivalent of seeds in the mushroom business (again, it's quite different from actual plant seeds).
3. Container: This is the physical structure that is encapsulating everything. It protects the substrate and mycelium from pests and harmful microorganisms, but also must permit adequate gas exchange so the fungus can breathe. The containers are often specialized mushroom grow bags but it's possible to create your own out of a 5-gallon bucket or other recycled materials.
Since most vendors distributing grow kits have experience and a developed technique, they are often guaranteed to successfully produce at least one luscious fruiting of mushrooms. Grow kits from inexperienced producers or those made at home for the first time could potentially have complications.
At Hodgins Harvest, we offer certified organic mushroom grow kits of various kinds. We carry Oyster, Pink Oyster, and Lion's Mane mushroom grow kits that are guaranteed to produce beautiful mushrooms! Our grow kits weigh around 7 lbs and can produce a whopping 3 lbs or more of mushrooms. For more information on how our grow kits work check out our illustrated instruction manual or watch this video.
Alternatively, you could make your own DIY "grow kit." Keep on reading to learn how.
Tips For Getting The Most Out Of Mushroom Grow Kits
Finding the right place to keep your grow kit is essential. Microclimates can often make the biggest difference in the size of your harvest, especially if you are in a relatively dry climate/season.
● Lighting: Contrary to popular belief, mushrooms don't grow in total darkness. They need at least a little bit of indirect light to know which direction to grow. Light also increases the Vitamin D content of the mushroom and is necessary for mushrooms to produce their colorful pigments.
● Humidity: Mushrooms fruit best in humid environments. We recommend finding a location with at least 50% relative humidity. If this is difficult due to your climate there are ways to overcome this problem. Spraying the fruiting bodies and the general fruiting environment can be an easy way to supplement moisture levels. Although you should be careful not to allow excessive moisture to build up on the surface of mushrooms as it can lead to bacterial growth. You can also use a humidifier near the mushrooms to help give it that extra kick! We sell small, inexpensive humidifiers that you can pair with our grow kits for better results, available here. Fruiting chambers are also another option for those struggling with increasing humidity levels.
● Temperatures: Most cooler weather mushrooms like Oyster and Lion's mane like temperatures between 55-75F. Pink oysters prefer higher temperatures of between 65-80F. These are ideal temperature ranges but most mushrooms have a tolerance to wider ranges.
Growing Oysters In 5-Gallon Buckets
If you’ve already had the joy of fruiting a mushroom grow kit or are just the DIY type, making your own "grow kit" at home is a fun and relatively easy endeavour. It doesn’t require any specialized equipment or a dedicated space in your house. The most unique item you will need for this process is the mushroom grain spawn that is used to inoculate your substrate. You can also use the leftover substrate from any of our oyster-variety grow kits to inoculate the buckets. You should use about 3 times as much leftover substrate as you would grain spawn because the growth of the mycelium will be less vigorous.
While there are many different ways to grow mushrooms, I’m going to share one of my favorite techniques for growing oysters on straw inside of 5 Gallon Buckets.
Equipment List

Bucket ready for drilling and 2 jars of home made Oyster Mushroom grain spawn.
● Straw: Straw can be found in many different places. Animal feed stores are an obvious choice but pet stores also carry straw bedding for smaller animals. You will want to cut or tear the straw into pieces that are between 5-8” in length. Alternatively, you can make your own straw by harvesting your own grasses and drying them until crisp and golden.
● 1 lb of Oyster Mushroom Grain Spawn: Grain spawn is mycelium grown on grain that is used to introduce the fungal culture into your substrate. It is produced in sterile conditions to ensure it's free of contaminants. This method is specifically for Oyster Mushrooms due to their adaptability to substrates. Many other gourmet or medicinal mushrooms are wood-loving species and thus don’t grow well on straw. Oyster mushrooms are also BY FAR the easiest mushrooms to grow because of their tolerance to environmental stress.

Before using your grain spawn make sure to break it up into small pieces! If the grain spawn is in a bag you can just do this by squishing the outside of the bag with your hands. If it happens to be inside a jar you can break it up by hitting it against a folded-up piece of cardboard on a hard surface.
● Five Gallon Bucket without Holes: This is what we are going to use for pasteurization. Make sure it is clean and hasn’t been carrying any harmful chemicals or paint. Also, it should have a well sealing lid.
● 5 Gallon Bucket with Holes: You can take the Five Gallon Bucket from the pasteurization process and add the holes post-pasteurization. Make sure it is cleaned, disinfected, and has holes as outlined in the image below. These holes will be sealed with micropore tape after inoculation. Alternatively, you can use other recycled containers such as water bottles and plastic bags to house your mushrooms.

● Boiling Water: You will need enough near-boiling water to fill the bucket. This about 12-15 liters or 3-4 gallons. To boil water you can use a large pot, water kettle, or whatever else you have to heat water. If you can’t boil it all at once you can add them in separate instances.
● Mesh Bag: This is a large mesh bag like the ones commonly used for citrus and other produce. Alternatively, you can use a pillowcase. You will place your substrate within this bag for the pasteurization and draining process.
● “Clean” Working Space: You don’t need a special lab or even to do this indoors. I’ve done plenty of inoculations outdoors just on a disinfected tarp. Ideally what you will want is a table with a plastic table cloth or clean tarp. Disinfect the table cloth with 70% alcohol or another disinfectant of your choice.
The Process:
1. Fill Your Mesh Bag
Begin filling the bag until it looks like it will fit in the bucket then place it inside the bucket. Continue stuffing it and don’t be afraid to compact it inside. Keep filling the bucket until completely full, making sure the lid still fits.
2. Pasteurizing The Substrate

Take your 5-gallon bucket (without holes and full of the substrate) and fill it with boiling or near-boiling water. As I mentioned previously, if you aren’t capable of boiling all the water you need at once, you can do it in multiple batches. If you live in a cold climate you can place a blanket or pillow beneath the bucket to help insulate it. Once the bucket has enough water to submerge the substrate you can place the lid on there and let it sit. Let the bucket sit 30-60 minutes. The hot water will kill off enough mold spores and other competitors to allow the oyster mushroom mycelium to flourish.
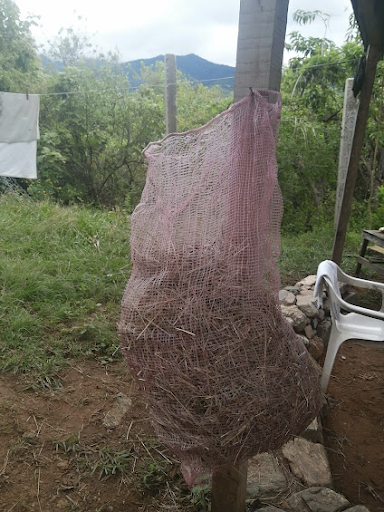
3. Draining The Substrate
Once ready, remove the mesh bag full of straw from the 5-gallon bucket and hang it to drain. I usually cling it onto a nail or a sturdy tree branch. You will have to let it hang for about 2-3 hours until you can only squeeze a couple of drops from it by clenching the substrate between your fist.
4. Inoculation
First things first, cleanliness. Make sure you and everyone participating has cleaned their hands and arms thoroughly with soap and water. Afterward, everyone should disinfect their hands with hand sanitizer or alcohol.
Make sure you have a clean working area, the grain spawn/grow kit substrate and a clean 5-Gallon bucket with holes handy. If using grain spawn, break it up into small chunks in the bag or bottle. If using leftover substrate from a grow kit, you can either tape over the holes in the bag or transfer it to a clean bag and break it up into small chunks. Once everything is ready, move the drained bag of straw onto your clean working surface and get ready to inoculate! The process is simple and almost resembles making a layered cake. First, a thin layer of substrate is placed on the bottom of the bucket with holes as bedding. This can be just 1-2” thick. Afterward, you will pour a layer of broken-up grain spawn or grow kit substrate onto the straw. Avoid touching the spawn/substrate directly with your hands and attempt to pour it from the container it’s in.
This will be followed by a thicker layer of straw (around 5") and another layer of grain spawn. When adding the next layer of substrate you can begin to compact it down with light pressure. Make sure all the nooks and crannies get filled and you don’t have excessive air space inside the bucket. This process is repeated until the bucket is full and you’ve used up the spawn.
To finish up, place the lid on the bucket and cover all the holes with a layer of micropore tape. Either on tape or directly on the bucket write the date and the variety of mushroom inoculated. For example “Jan 29, Grey Oyster Mushroom”.
5. Incubation and Fruiting
For the 5-gallon bucket to fully colonize it will take around 2-4 weeks depending on temperature. Try to keep it at roughly 70F/21 C. If it's cooler temps, it'll take longer to colonize, and at warmer temps, it will be a little quicker. However, once you get over 75F/24C you run a higher risk of contamination by mold. After a week or two, you can peek into the bucket and see how colonized it looks. It should be turning white and cottony with mycelium! If you see green growth, that's mold. You can try pulling it off and letting the bucket finish but if it takes over the bucket, you'll need to toss it out and try again.
Eventually, you will begin to see small clumps of mycelium beginning to form below the micropore tape on the bucket. You can remove these to give the mushrooms a hand or watch the mycelium push its way through! In order to trigger the mycelium to fruit (produce mushrooms), follow the tips for our grow kits outlined above. After the mushrooms have fully formed, harvest and continue to give them a humid environment to get more flushes.
Check out our recipe blog for tips on cooking with oyster mushrooms, happy mushrooming!


Timo Mendez is an environmental scientist and freelance writer with expertise in fungi, regenerative farming, and other environmental topics.
You can learn more about Timo on his personal website: https://timendez.wixsite.com/portfolio


